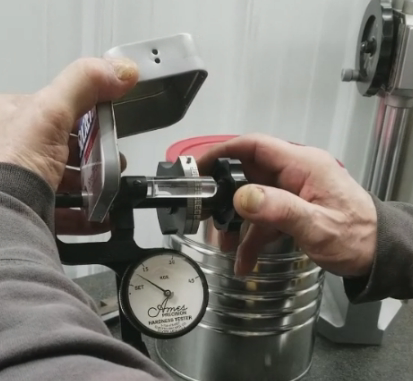
The object of hardness testing tin plate is to determine the Temper (hardness) designation of the material. This is a classification system where the temper designation indicates the appropriate use for your tin plate. Tin plate has different and specific characteristics at each designation. The higher the temper designation, the harder the material.
You can test tin plate in either the Rockwell 15-T scale (R15T) or in the Rockwell 30-T scale (R30T) and you will always use a diamond spot anvil. The diamond spot anvil is used to avoid the “anvil effect” which is when the result of the test is affected by the steel anvil because the thinness of the material being tested did not support the major load pressure. In other words, the hardness of the anvil was tested rather than the material. The Diamond Spot Anvil is too hard to yield to the major load and, therefore, will not influence the test results. The selection of scale is determined by the thickness (or weight) of the material to be tested. The thickness of the tin plate is designated as a weight. Tests in R15T are made on plate which is less than 75 lbs. per base box. Tests in the R30T are made on plate which is over 75 lbs. per base box.
Since the standard used by the U.S. Tin Can Industry is the R30T scale, all R15T test results must be converted to R30T. For conversion and determination of Temper Designations with related characteristics, we offer the following chart:
Temper Tin Plate
Designation R30T R15T Characteristic
   T-1        52 maximum      78.5 maximum        soft for drawing

   T-2        50 to 56        77 to 80        moderate drawing
                                Where some stiffness
                                is required

   T-3        54 to 60        79 to 81.5      shallow drawing

   T-4        58 to 64        81 to 85        general purpose
                                Where increased
                                stiffness is required

   T-5        62 to 68        82.5 to 85.5        stiff, rephosphorized
                                Steel used for
                                Hardness to resist
                                Buckling

   T-6        67 to 73        85 to 88        rephosphorized steel
                                for great stiffness
Tinplate is a popular material used in the packaging industry due to its excellent corrosion resistance and durability. However, the mechanical properties of tinplate can vary depending on the manufacturing process and the thickness of the coating. Therefore, it is essential to conduct hardness testing to ensure that the material meets the required specifications. Hardness testing is a non-destructive method that measures the resistance of a material to deformation. The Ames Portable Hardness Tester is a useful tool for testing the hardness of tinplate.
What is an Ames Portable Hardness Tester? The Ames Portable Hardness Tester is a handheld device that uses the Rockwell hardness testing method to measure the hardness of a material. The tester consists of a spring-loaded diamond-tipped indenter that is pressed into the surface of the material under a specified load. The depth of the penetration is measured, and a hardness value is calculated based on the amount of penetration. The Ames Portable Hardness Tester is easy to use and can provide accurate and repeatable results.
How to Test Tinplate with an Ames Portable Hardness Tester: Before conducting a hardness test on tinplate with an Ames Portable Hardness Tester, it is essential to ensure that the surface of the material is clean and free of any contaminants. The test should be conducted on a flat surface of the tinplate that is at least ten times thicker than the depth of the indentation. The test should be conducted using the C-scale, which is the most common scale used for testing tinplate.
To conduct the test, the Ames Portable Hardness Tester is placed on the surface of the tinplate, and the load is applied by turning the knob on the device. The load should be applied slowly and evenly to ensure accurate results. After the load has been applied, the indenter is removed, and the depth of the penetration is measured. The hardness value is then calculated using the following formula:
Hardness = 100 – (Depth of penetration x 2)
The hardness value can then be compared to the required specifications to determine if the material meets the necessary hardness requirements The Ames Portable Hardness Tester is easy to use and can provide accurate and repeatable results. By conducting hardness testing with an Ames Portable Hardness Tester, manufacturers can ensure that their tinplate meets the necessary hardness requirements and is suitable for use in a wide range of applications.
